


| | |
![]()
![]()
![]()
![]()
![]()
![]()
![]()
![]()
![]()
Xformer
10
Online Documentation
Atari 8-bit Emulator For Windows
updated
10-10-2018
Run your favorite Atari 8-bit games and BASIC programs on Windows!
The 1980's are back! Xformer runs your Atari 400/800, Atari 800XL, and Atari 130XE software on your PC.
The original Xformer project began in 1986 as an effort to run Atari 800 BASIC on the Atari ST desktop computer using emulation to translate the 6502 machine code of the Atari 800 to the 68000 machine code of the Atari ST.
In the past 32 years since, Xformer has been ported to the Atari TT, MS-DOS, Windows NT, Windows 95, Windows 98, Windows 2000, Windows XP, and Windows 7 making a total of 9 major releases across multiple platforms:
ST Xformer is the original version for the Atari ST, STe, and Atari TT and was the first version to support the Xformer Cable for connecting Atari floppy disk drives to the emulator,
Xformer Classic was a major port from 68000 based Atari computers to Intel 286 based PCs and runs on MS-DOS, Windows 3.1, and OS/2 and also supports the Xformer Cable,
Xformer 2000 which runs on Windows 95, Windows 98, Windows Me, Windows NT, Windows 2000 and Windows XP offers enhanced sound and joystick support, and replaces the earlier Xformer 98 emulator for Windows 98,
Gemulator 9 (the 9th and most recent release in 2008) combines Atari 8-bit emulation and Atari ST/STe emulation into a single emulator for use on Windows XP, Vista, and Windows 7 and support for running on both 32-bit and 64-bit Windows operating systems.
ST Xformer, Xformer 2000, Xformer Classic and Gemulator 9 are completely free and have been available for download from this web site for many years. And that now includes the brand new Xformer 10 release for Windows 10.
Which version to download? Simple!
If your PC or tablet is running the latest Windows 10 release (for 32-bit x86, 64-bit x64, or 64-bit ARM64 devices) download and use Xformer 10. It's the easiest to use and requires zero configuration to get running. Just watch the demo video below to learn how to drag-and-drop your Atari program binaries to run them automatically configured to the correct hardware settings!
If your PC is running Windows 7 and has a CPU running at least 2 GHz you may also try running Xformer 10 with some limited restrictions such as lack of touch-screen pinch and zoom support in Tiled mode, and you may experience a slower frame rate with older video cards and video drivers.
If your PC is running Windows NT, Windows 95, Windows 98, Windows 2000, Windows XP, Vista, or a slower/older Windows 7 machines (such as Pentium 4 CPU or older), download Xformer 2000.
For even even older PCs such as 386 and 486 based desktops, download Xformer Classic for MS-DOS.
All versions of Xformer support the mounting of Atari disk image files with the .ATR and .XFD file extensions. Users of ST Xformer can also mount their old .SD and .DD disk image.
Using the optional Xformer Cable with Xformer Classic (on MS-DOS only) you can directly connect Atari 810, Atari 1050, XF551, Indus GT, and Rana disk drives to your PC to transfer Atari 8-bit files and disks to your PC. Xformer Classic and Xformer Cable are no longer supported. The DOS software and instructions for building the cable are provided as-is. We no longer manufacture or sell the Xformer Cable, and recommend USB-based solutions such as SIO2USB for transferring data between an Atari 8-bit computer and a modern PC.
Now the 10th official release of Xformer, released on October 10 2018 and of course called of course Xformer 10, has been largely rewritten and optimized for today's Windows 10 PC's and Windows 10 ARM64 devices, such as Microsoft Surface tablets, all-in-one touch-screen Sony VAIO desktops, and all-day Qualcomm Snapdragon based ARM64 tablets. Xformer 10 has also been verified to run on Windows 7 machines but some of the cool new features that you will read about below are best used with modern touch-screen hardware.
After almost three years of development by Xformer creator Darek Mihocka and fellow Atari 8-bit developer Danny Miller, there are two big themes in this major upgrade of the classic ATARI 8-bit emulator Xformer:
· Tiled Mode - browse thousands of programs at once, each one a playable thumbnail by keyboard, mouse, Xbox controller, or touch-screen. No more running just one Atari program at a time, that's so yesterday!
· "It Just Works" - auto detection of the exact configuration of an ATARI computer that the program needs, and auto-detection of whatever joystick or other controller you are using. Previously, it might have taken several minutes of manual configuration before a program would run under an emulator... not exactly making it easy to quickly browse a lot of titles to see what you want to play. Most of the configuration dialog boxes from earlier versions of Xformer are now gone, because, well, you simply don't need them!
Tiled Mode coupled with "It Just Works" means that instead of being able to look at one program every minute or so, it only takes a couple of seconds to browse hundreds of titles all running simultaneously!
Xformer 10 now does cycle accurate emulation, cycle accurate ANTIC DMA and much better emulation of the many hardware registers of the ATARI home computers, for a better than 99% compatibility rate.
And there are dozens more cool new features as well, that we will briefly describe to get you up and running your favorite ATARI programs on your Windows machine quickly and effortlessly.
STARTING ATARI DISK IMAGES - NEW TILED MODE
To run a disk image of an ATARI program under our emulator, you can use the File/Open Folder menu item to open either an individual program, or a folder that contains any number of programs that you want to run all at the same time. But it's probably easier and more fun to simply drag and drop a file or a folder onto our icon once you place it on your desktop.
We support ATR, XFD, ROM, BIN, CAR, GEM, COM, EXE, XEX and BAS files. CAS and ATX/PRO file support is coming soon (cassette images and copy protected disk images).
F5 toggles between the new tiled mode and using a program full screen. Don't forget that in tiled mode, you can use the touch pad or mouse wheel to scroll the tiles vertically, or if you have a touch screen, scroll with your finger on the screen. In single program mode, you can use the same methods to scroll horizontally between all of the programs you have loaded using the feature we call "roulette mode".
We support the pinch gesture both on the touchpad and when touching the screen on a touch screen device. Pinching in from full-screen mode (no menu bars) will put you into windowed mode for a single program, and pinching again will take you into tiled mode. Zooming will go in the opposite direction.
It's easy to get lost with thousands of titles loaded at the same time, so with the focus on the title bar, you can type something, and only programs whose disk image name starts with that phrase will be shown. For instance, type "star" and only programs named star something or other will be shown (that still may be a large number; that was a popular phrase for a game title).
Whenever you close XFORMER 10, unless you have unchecked "File/Restore Last Session on Startup", it will remember the exact state of every single program (maybe thousands of them!) and next time you start XFORMER10, you will pick up where you left off. You can also save your session at any time, and keep as many snapshots as you want of as many combinations of programs and their exact states as you like.
TURBO MODE
Use ALT-F1 to toggle between running your program in real time or as fast as possible, but be warned, our emulator is the fastest available and a single program may run up to 100x normal speed (or even faster) in turbo mode. Turbo mode is great fun in tiled mode, making sure they all boot up quickly so you can see them all in action right away.
"IT JUST WORKS" - finding the right ATARI system for your program
Many programs need a particular ATARI system to work, either a 400/800 XL or XE, with or without the BASIC cartridge, and either in the North American NTSC or the European PAL video system. That's 12 combinations! Up until now you have always had to manually select the 12 different possible systems until you found one that worked. Our artifical intelligence algorithm will automatically detect what kind of system is needed. You may see the ATARI reboot a couple of times as the program starts, but that is normal. In the rare instance that auto-detect does not work (but out of thousands of test cases auto-detect works 99.5% of the time) you can still manually select the system that you need by turning off "Auto-detect VM type" in the menus and then using Alt-F10 or "Change VM type" to try 400/800 vs XL vs XE, Shift-F10 to toggle the BASIC cartridge and ALT-F12 to toggle NTSC/PAL mode until it works. In rare instances you may need to cold start (CTRL-F10) after switching between NTSC and PAL.
TIME TRAVEL - 13s backwards in time, or to a fixed point in time
If you die in your favourite game and want another chance, you've got it! Just press PAGE UP to enable time travel in a program. Then, whever you press PAGE UP, you will go back in time 13 seconds or so! Remember, Galaxy Quest fans, 13 seconds has been proven to be the optimal amount of time travel. Are you about to do something especially challenging in a game and you want to remember a certain fixed point in time as the time you want to go back to instead of going back 13 seconds? Just press PAGE DOWN and from now on PAGE UP will return you to the point you were at when you last pressed PAGE DOWN. The menu will allow you to go back to 13 second time travel whenever you want.
GAME CONTROLLERS and SPECIAL KEYS
We support ATARI joysticks, paddles, driving controllers, video touch pads and numeric key pad devices. Just plug them into any USB port using one of the several inexpensive ATARI joystick to USB adapters available. In the "It Just Works" philosophy of XFORMER 10, there are no menu items to select what controllers are plugged in, we will figure it out! Make sure your joystick is centered when you plug it in (and you aren't pushing the stick in any direction). Press 0 or # on the bottom row of the video touch pad for it to be recognized. But other than that, it should just work. If you plug in 4 joysticks for a 4 player game, a little trial and error will figure out which joystick is for which player.
You can play a 1 player game using the keyboard without a joystick. The arrow keys control the direction of the joystick (as do the keys of the numeric key pad, if you have one). Left control, right control, left mouse button and numeric keypad 0 are all the fire button. Most people are used to using the left control button, but occasionally that will interfere with a complex program that both uses the joystick plus allows you to use keystrokes requiring the control key, so there is a menu item to "Disable L-CTRL as Fire".
The ATARI inverse video key is the ` or ~ key on your keyboard. The ATARI break key is the END key on your keyboard. The ATARI clear key is the HOME key on your keyboard.
F1 to F4 on your keyboard are the ATARI 1200XL function keys.
F6 is HELP on a XL/XE.
F7 is START.
F8 is SELECT.
F9 is OPTION.
F10 is RESET.
We also emulate a light pen. The mouse will be the position of the light pen, and pressing the joystick up (or using the up arrow key) is the light pen/gun trigger. If you want to emulate the experience of not being able to easily aim the light gun, play the program in full screen mode (Alt-Enter). The mouse cursor will disappear and it will be harder to aim the light gun.
An XBOX controller makes a great controller for XFORMER 10. It can serve as both a joystick and a paddle. For joystick games, use the usual left most joystick and the A button for fire. For paddle games, use the right most joystick. The paddle fire button is pressed by moving the left most joystick to the left.
The START, SELECT, and OPTION keys are available on the XBOX controller, so that you can play on a tablet that does not have a keyboard connected (and therefore doesn't allow you to press F7, F8 or F9). They are the XBOX controller buttons B (START), X (SELECT) and Y (OPTION).
ENTERING A PROGRAM BY PASTING (WITHOUT TYPING)
If you copy a program listing you find on the internet into the clipboard, you can simply paste it into XFORMER 10 without having to do any typing! Or you can paste a large amount of text from one of your PC files into an ATARI word processor without having to retype it!
For instance, if it is a BASIC program for an ATARI 800, start a new virtual ATARI BASIC machine with the FILE/NEW VM/ATARI 800 menu option. Then choose VM/Toggle BASIC or press SHIFT-F10 to enable BASIC. Then choose VM/Paste Text as ASCII (or ATASCII) depending on if the text is a regular PC text file, or a special ATARI program in ATASCII (try both if you're not sure).
Hint: POKE 82,0 to move the left margin all the way to the left just in case there are very long lines you are pasting that won't fit otherwise.
SWAPPING DISKS AND CARTRIDGES
To virtually insert a cartridge into the ATARI, choose the Disk-Cartridge/Cartridge menu item. You can also remove it. To virtually insert a disk into a disk drive, choose Disk-Cartridge and either D1: or D2: and click on the disk image file on your computer. Some of the more complicated games filled up several diskettes, so when they ask you to swap disks, you will choose D1: and then choose the disk image of the second part of the program (or whichever disk is being called for). You choose the Unmount option to remove a disk so the virtual disk drive will be empty.
You can also toggle whether or not your virtual drive is write protected or not and will allow you to write to the disk image. Choosing this will emulate putting on or removing the write protect tab on whatever virtual disk is inside that disk drive.
MOVING A DISK IMAGE BACK TO A REAL ATARI
If you have an ATR disk image, you can use it with an ATARI emulator, or use it with the APE ATARI interface to load it into a real ATARI and use the program there without needing an actual ATARI floppy disk with the program on it. However, APE does not work with many of the disk image formats that XFORMER 10 does. So what if you have a disk image of an individual machine language binary (a .XEX file, for example) or an individual BASIC program (a .BAS file, for example)? You can easily use them on an emulator, but there has never been a way to go back to using it on a real ATARI computer... UNTIL NOW!
Load or drag and drop a copy of ATARI DOS onto XFORMER 10. Inside DOS, mount your ATARI file disk image on D1, and for D2:, choose "Create Blank Disk/Single Density". Now use DOS to duplicate disk 1 to disk 2.
What will happen in this scenario, is that the single file disk image is emulated as if it was an entire disk image, so copying it to a new disk image will create an ATR file out of your XEX, BAS or other disk image. Now you can use APE to run that newly created ATR file on a real ATARI computer.
Full Keyboard Summary for Xformer 10:
The following keystrokes can be used while running Atari 8-bit software on Xformer 10:
QUESTIONS? BUG REPORTS? Please email us at "emulators@emulators.com"
For PCs not running the latest Windows 10...
Introducing XFORMER 2000
Xformer 2000 is the Atari 8-bit emulator for Windows 2000 and XP, made by the same people that brought you the ST Xformer Atari 8-bit emulator for GEM, and the PC Xformer Atari 8-bit emulator for MS-DOS. Gone is the command line of the MS-DOS based PC Xformer. Now you simply click with the mouse to configure Xformer’s options. Turn sound on and off, turn joysticks on and off, change modes, even install Atari 8-bit disks all using the mouse. The settings can be saved at any time so that the next time you start Xformer, it is as you left it before.
Xformer 2000 has these improvements over the MS-DOS versions of PC Xformer and earlier Windows versions of Xformer:
The screen dumps below are actual Windows 95 screen dumps of Xformer 2000 and Xformer 98 running various Atari 8-bit games. Run Lode Runner, Star Raiders, Joust, Boulderdash, even M.U.L.E. on your PC. Download these and other games from various Internet sites, run them from our CD-ROM suite, or use your existing Atari disks using your home built Xformer Cable.


PC Xformer allows you to run non-copy-protected Atari 400/800, 800XL, and 130XE software directly on your PC, in full 256 color graphics. Some copy protected disks can also be run when using the Xformer cable in MS-DOS.
Both DOS and Windows versions of PC Xformer have support for emulating:
In addition, Xformer 2000 gives these additional features on Windows 95, Windows 98, Windows NT, and Windows 2000:
PC Xformer is backward compatible with earlier versions of PC Xformer and ST Xformer and supports disk files created by the Xformer cable, SIO2PC cable, ST Xformer, and earlier versions of PC Xformer.
PC Xformer runs at full speed on a fast 386 or 486 processor. On Pentium based machines it runs incredibly fast. For compatibility with programs that run best at the normal 1.8 MHz speed of the Atari, PC Xformer has two speeds of operation: NORMAL (1.8 MHz mode) and TURBO (as fast as possible mode). All of the options, such as selecting normal or turbo speed, whether to run with Atari BASIC, whether to run in Atari 800 or XL/XE mode, etc. can all be set from the MS-DOS command line.
PC Xformer has a built-in 6502 debugger which allows you to examine and modify the Atari memory, disassemble 6502 code, and even single step 6502 code. For die hard hackers PC Xformer also supports the ability to customize the Atari OS and BASIC.
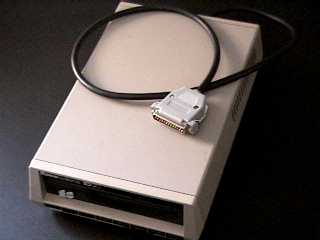 In 1988 we designed a special cable to allow ST Xformer users to connect Atari 8-bit disk drives to their Atari ST computers. The same cable, with a minor modification can also be used on your PC for use with PC Xformer. Over the past 11 years thousands of Atari users have built the Xformer cable based on our design described here.
The cable, pictured here, plugs on one end into an Atari 8-bit disk drive such as an 810, 1050, Rana, Indus GT, or XF551, and on the other end plugs into your ST's or PC's printer port. Other Atari SIO devices, such as the color plotter and dot matrix printer are also supported, so go dig them up out of your closets!
We no longer manufacture the cables ourselves but you can make your own for about $5 in parts. All you need is a one half of a black Atari SIO cable (with the 13-pin connector on one end, bare wires on the other), a DB-25 male connector, and a 4.7K pull up resistor. Of course, a soldering iron and experience with soldering also helps.
The PC Xformer cable pinout is slightly different from the ST Xformer cable pinout. This was due to the fact that pin 1 on the Centronics port behaves differently on the ST and PC. For that we added a pull up resistor on pin 11. The modified cable is compatible with the ST, so one cable can work with both PC Xformer and ST Xformer.
DB-25 pin numbers are pretty standard. Data output pins are pins 2 through 9, and the printer busy pin is pin 11. Ground is pin 18. On the Atari side, I'm going by the pin numbers published in the Atari Technical Reference Manual. The pins are as follows:
pin 2 - clock out
pin 3 - data in
pin 4 - ground
pin 5 - data out
pin 7 - command
pin 10 - +5 volts
Ok, now the old ST Xformer cable pinout goes like this (Atari DB-13 pins on the left, DB-25 on the right):
pin 2 - clock out - pin 3
pin 3 - data in - pin 11
pin 4 - ground - pin 18
pin 5 - data out - pin 5
pin 7 - command - pin 7
pin 10 - +5 volts - pin 1
For the new PC Xformer cable, you move the +5V line from pin 1 on the DB-25 to any of the unused data output pins (2, 4, 6, 8 or 9). I chose pin 9 just to keep the spacing of the wires 2 pins apart. Then run the 4.7K pull up resistor from the data in pin (pin 11) to any of the unused data out pins. I chose pin 2 which gives you lots of room for the resistor. The new pinout is:
pin 2 - clock out - pin 3
pin 3 - data in - pin 11
pin 4 - ground - pin 18
pin 5 - data out - pin 5
pin 7 - command - pin 7
pin 10 - +5 volts - pin 9
Place the 4.7K pull up resistor between pins 2 and 11 on the DB-25. That's it! You now have a Xformer Cable.
Disclaimer! We do not provide technical support for cables which you build yourself. The cables were manufactured and sold by us directly between 1988 and 1996. In 1996 we stopped manufacturing the cables ourselves but the cables do continue to be made by some Atari dealers such as B & C and others. So if you need a cable and don't wish to risk building one yourself, order one from your favorite Atari dealer.
The instructions above have been verified to be accurate and hundreds of people have confirmed successfully building their own cables. If you are not familiar with electronics, with soldering irons, reading pinouts, reading the stripes on a resistor, etc. you should probably not attempt to build your own cable!
Ok, just how fast is PC Xformer? We belive it to be the fastest 6502 emulator available for your 486 or Pentium. We put a real 130XE computer side-by-side with a 486/66 computer and a Pentium P5-90 computer then ran some benchmarks in Atari BASIC. We found the 486/66 runs at least 4 times faster than the 130XE, while the 90 MHz Pentium runs at least 8 times faster, and sometimes faster!
Benchmark #1 is a simple FOR NEXT loop:
Atari 130XE: 22.5 seconds
66 Mhz 486: 4.6 seconds (5 times faster)
Pentium/90: 2.4 seconds (9 times faster)
Benchmark #2 is a screen scrolling benchmark:
10 FOR X = 1 TO 10000
20 ?X;
30 NEXT X
Atari 130XE: 109 seconds
66 Mhz 486: 29 seconds (4 times faster)
Pentium/90: 14 seconds (8 times faster)
And finally, Benchmark #3 is a graphical line sweep:
10 GRAPHICS 8
20 COLOR 1
30 FOR X = 0 TO 319
40 PLOT X,0
50 DRAWTO 159,159
60 NEXT X
Atari 130XE: 32 seconds
66 Mhz 486: 8 seconds (4 times faster)
Pentium/90: 4 seconds (8 times faster)
Now you can understand why for games we needed to supply a normal speed option!
Before anything else, make sure that you have a computer capable of running Xformer 2000. You will need Windows 95, Windows 95 OSR2, Windows 98, Windows NT 4.0 with Service Pack 3, or Windows 2000. Your computer must have a 486 compatible, Pentium compatible, an AMD Athlon, or AMD K6 processor. If your computer is not capable of running Xformer 1000, but is capable of running MS-DOS, you can download the free PC Xformer Atari 8-bit emulator for MS-DOS.
The Xformer 2000 software comes in a single ZIP file called XF2000.ZIP. Extract it with PKZIP and you will find the following files:
The XFORMER8.EXE program can be stored anywhere on your hard disk, or placed directly on the Windows desktop as shows in the screen dumps below.
You should install the latest DirectX 9 (available online from http://www.microsoft.com/directx). DirectX allows you to switch Xformer 2000 (and other Windows games) to full screen mode for maximum video performance.
If you are already familiar with using Gemulator 2000, then Xformer 2000 will be a snap to use. We’ve kept many of the same keyboard assignments as in PC Xformer and Gemulator.You can download additional Atari 8-bit games and demos by download the PC Xformer 3.8 emulator from our web site. All .XFD and .ATR files can be used with either Xformer 2000, Gemulator 2000, or PC Xformer.
If you are already running PC Xformer or Xformer Classic
Xformer Classic refers to the MS-DOS versions of PC Xformer (versions prior to version 4.0). If you currently have Xformer Classic installed, save XFORMER5.EXE to the same directory as your Xformer Classic program. You will need to set the paths to your disk images using the Disk Properties dialog box.
Shift+F5 no longer exits Xformer 2000. Instead, press Ctrl+F11 or right click the mouse to bring up the main menu from where you can then exit.
If you are already running Xformer 98
Simply extract XFORMER7.EXE into your existing Xformer 98 install directory and run it. Xformer 2000 will read your previous Xformer 98 settings.
Tips for getting fastest screen redraws
Xformer is is optimized for use with 256 color Windows video drivers. For best results, run Xformer in a 256 or 65536 color video mode. Do not run in a 16 color VGA video mode, as most VGA drivers and cards are not optimized for that mode.
Since Xformer is very graphics intensive, it is preferable to use a PCI or AGP video card. Avoid PCs with older 8-bit and 16-bit VGA cards.
On PCs that still show slow redraw speeds in a window, it is best to install DirectX and run Xformer 2000 in full screen mode rather than in a window.
The "Zoom mode" option may be slow on some older VGA cards or cards with unoptimized drivers. If screen updates seem very slow and jerky, turn off this option. For example, on the same Pentium II based computer we tested an ATI 3D RAGE PRO card vs. a Matrox Millenium II, both whcih are AGP cards, but the ATI card was significantly faster than the Millenium card when the Zoom mode was enabled. To test for this, type in the following Atari BASIC program:
10 FOR X = 1 TO 10000
20 ?X;
30 NEXT X
Click the minimize box near the top right corner of the Xformer window to temporarily hide the Xformer window to the Windows task bar. This reduces the CPU consumption when Xformer is not in use.
An important tip: Use the Windows keystroke Alt+Enter to switch Xformer 2000 in and out of full screen mode. Do not use Alt+Tab or Ctrl+Esc to switch away from a full screen window as this does not work correctly with all video drivers. You will also find that the dialog boxes are too large to completely fit in the 320x240 screen, so you need to either switch to windowed mode first, or be running in 512x384 mode to see the dialog boxes completely.
When Xformer starts up you are presented with main dialog box with some menu items and a mode selector as shown below. The mode selector chooses between emulating Atari 800, Atari 800XL, and Atari 130XE computers. Simply choose the computer you want by clicking on the mode selector and then click Continue to boot up in that mode.

When running Xformer, you can at any time right click the mouse or press Ctrl+F11 (or click the Menu on your Windows keyboard) to bring up the main menu again. The main menu bar has these menu items:
Properties – this brings up the Properties dialog box shown below which allows you to turn on sound, turn on joystick support, toggle the BASIC cartridge on and off, assign ports, and control the display. In Full Screen mode, Xformer 2000 switches to either 320x240 or 512x384 mode using DirectX (depending on whether the Zoom option is on or off). Note that not all video cards support 320x240 DirectX mode and may even crash your PC, so always try Full Screen mode with Zoom mode off first, then try with Zoom mode on.
The Joystick and Sound options turn on the Windows joystick and sound support. On slower PCs this may use up a lot of CPU time. Use these options only if necessary.
The Cartridge options toggles Atari BASIC on and off. You can also press Shift+F10 to toggle BASIC on the fly.
Disk Properties – this brings up the Disk Properties dialog box, which allows you to assign .ATR and .XFD files to the Atari disk drives D1: through D9:. Unlike previous versions of Xformer, the disk image files may be located anywhere and need not be in the same directory as the Xformer 2000 program. You can also activate this dialog by pressing Shift+F11. Remember that any disk image you assign to drive D1: MUST BE BOOTABLE, such as a DOS 2.x or MyDOS boot disk. Those are provided in the XF2000.ZIP file download.
Display Options – this is a repeat of the Full Screen, Zoom, and Fast modes from the Properties dialog. There is also a Skip Startup item which will skip the main menu screen when Xformer 2000 is started.
Save Settings – this saves the current Properties and Disk Properties settings to your Windows directory.
Reboot Emulator – this reboots the Atari 8-bit. You can also use the Ctrl+F12 keyboard shortcut.
Next Mode – this cycles through the three modes (800, XL, XE). You can also use Alt+F12.
Next Monitor – this toggles between color TV and black and white TV mode. You can also use Shift+F12.
The following keystrokes can be used while running Atari 8-bit software on Xformer 2000:
![]()
![]()
![]()
![]()
![]()
![]()
![]()
![]()
![]()
Apple, Mac OS, Macbook, Apple Silicon and Macintosh are registered trademarks of Apple Computer, Inc. Atari is a registered trademark of Atari U.S. Corporation. Athlon, Athlon XP, Opteron, Phenom, and Ryzen are registered trademarks of AMD. Arm is a registered trademark of Arm Limited. Microsoft, Windows, Windows NT, Windows XP, Windows Vista, Windows 7, Windows 8, Windows 10, Windows 11, Visual Studio, .NET, and/or other Microsoft products referenced herein are either trademarks or registered trademarks of Microsoft. Intel, Pentium, Core 2, Core i7, and Atom are registered trademarks of Intel. PowerPC is a trademark of IBM. Additional company and product names may be trademarks or registered trademarks of the individual companies and are respectfully acknowledged.