


| | |
![]()
![]()
![]()
![]()
![]()
![]()
![]()
![]()
![]()
![]()
The 60 Minute Windows XP Tutorial
by Darek Mihocka, President and Founder, Emulators Inc.
updated October 28 2001
Over the past few months I've given you a few reasons why you should hold off buying that new computer or upgrading your existing computer until Windows XP has arrived. And I've also given you 15 great reasons to upgrade to Windows XP from a previous version of Windows.
Now that Windows XP has finally arrived and is available for purchase at most computer stores, I will tell you a few things about using Windows XP and customizing Windows XP.
But first, I've received a lot of email from people asking what the difference between Home Edition and Professional Edition is and what kind of PC you need to run it on. Having installed Windows XP beta releases and final releases dozens of times (probably over a hundred times) in the past 12 months, I certainly know!
This page contains a number of screen shots which are best viewed at an 800x600 or higher resolution. Be patient, the screen shots may take a while to completely download. Click on a thumbnail to view the full sized screen shot.
WHAT KIND OF PC YOU NEED
The first question of course is, can your PC even run Windows XP? XP is based on the Windows NT operating system (which is also the basis of Windows NT 4.0 and Windows 2000), and not on the DOS operating system which has been at the core of Windows 95, Windows 98, and Windows Millennium. While DOS and DOS based Windows releases have always targeted the lowest end home computers, NT has targeted business machines and servers and thus has always required more memory and a faster processor.
You can see the increasing progression of system requirements if you take a look at the chart on our Benchmarks page. The various Windows releases are listed chronologically, and so it comes as no surprise then that Windows XP has the highest requirements.
I believe the official Microsoft party line on Windows XP is that it requires a 233 MHz (or faster) processor and at least 128 megabytes of memory. In other words, a Pentium II or AMD K6 class machine. This represents most PCs sold during the past 5 years.
I have confirmed that the 128 megabyte requirement is actually overkill. Windows XP will install and run in 64 megabytes of memory, just as its predecessors Windows 2000 and Windows Millennium do. However, at 64 megabytes you are just at the verge of running out of memory and causing a lot of disk swapping. I found by experimenting with different memory sizes and 80 megabytes is a good minimum amount of RAM, which allows you to boot Windows XP and run the browser without running out of physical memory.
Most of the increased CPU power necessary to run Windows XP is really for the "eye candy". Windows XP really doesn't need any more powerful a PC than Windows 2000 or Windows Millennium did. It just wastes more CPU cycles drawing cute things. The translucent windows, the colorful icons, the scrolling menus, these all take additional resources in terms of CPU and video card power. I'll show you how to turn off the eye candy and switch Windows XP to the normal Windows interface that you are familiar with, and this will make it run better on the older PCs.
THE NEED FOR XP
After the release of Windows 3.1 in 1992, Microsoft split Windows into two separate teams and two separate sets of product releases. For home users and basic business workstations, Microsoft offered Windows For Workgroups (1993), Windows 95 (1995), Windows 98 (1998), and Windows Millennium (2000). On the high end side, Microsoft offered the various NT releases including Windows NT 3.1 (1993), Windows NT 4.0 (1996), and Windows 2000 (2000).
One of the annoying thorns in the side of both developers and users has been this duality in Windows. The same look and feel on the outside, but completely different engines "under the hood". While the Windows 9x/Me releases contained the same 20 year old DOS kernel as Windows 3.0, the NT releases featured a full 32-bit pre-emptive multi-tasking kernel. Two completely different sets of system calls, with maybe about 90% overlap, but huge differences as far as things like device drivers and stability.
One of the tragic things as far as Windows goes is that most PC users are completely unaware that they had a choice of Windows release. Many people stupidly suffered from the "blue screen of death" in Windows 98, not knowing that they could have simply put Windows NT 4.0 on the machine instead.
And people who knew enough to get NT were usually disappointed to find out that their favorite video card or sound card did not have a Windows NT compatible device driver. This caused NT to not catch on with home users, and especially gamers.
One of the causes of the duality was Microsoft itself. After the release of Windows 95 and Windows NT 3.51 (both in the summer of 1995), Microsoft said it would merge Windows back into a single product. The first crack at this was in 1996 with the release of Windows NT 4.0. It featured the new look and feel of Windows 95, but lacked basic DOS features such as support for the FAT32 file system. Microsoft tried again in the year 2000 with Windows 2000, now featuring FAT32 and many of the new system calls added in Windows 98, bit it once again failed to merge all of the system calls into one release.
Windows XP is finally that merged release of Windows - merging the DOS system calls of Windows 9x/Me with the 32-bit kernel of Windows NT and 2000. Other than the fancy new desktop, there is really nothing new in Windows XP. It is simply a good solid merged release of all the previous Windows releases. Those of use who have been using NT for years are finally saying "IT'S ABOUT TIME" and those people who have been suffering with Windows 95/98/Me are also saying "IT'S ABOUT TIME"!
DIFFERENCES BETWEEN HOME AND PRO EDITIONS - MONEY!
OK, so what's wrong with this picture? Well, if you've followed the pricing of Windows, you know that the home releases (95/98/Me) has always cost much less than the NT releases. Typically $99 for an upgrade of the 95/98/Me product vs. $199 for the NT product. So what was Microsoft to do now that the two products were being merged into one? Offer two versions!
As much as Microsoft's marketing may lead you to believe, Windows XP Home Edition is NOT strictly an upgrade for Windows Millennium, and Windows XP Pro Edition is NOT strictly an upgrade for Windows 2000 Pro. That's just marketing mumbo jumbo to justify the $99 and $199 prices of each release.
In reality, both Windows XP Home Edition and Windows XP Pro Edition are the same product. Same kernel, same system DLLs, same system calls, same everything. I've compared the release CDs and the installed products. The two products are 99% identical in terms of executable code and in terms of memory footprint and memory consumption.
But there are several subtle differences, the three main differences that I find important being:
the ability to log in to a Windows NT domain
the Remote Desktop feature
NTFS file encryption
All three features are missing from Home Edition but are present in Pro Edition (and existed in similar form even in Windows 2000). The three features are very obviously geared to business users and this come with the extra $100 price tag.
What it comes down to is this: if you are home user with a single PC which you use to surf the web, email, write letters, download music, you don't need the Pro edition.
If you use a notebook computer and file security is important to you, you may want the NTFS file encryption which first appeared in Windows 2000. Although there are alternate solutions available, such as PGP, which can similarly encrypt and protect the files on your computer.
The Remote Desktop feature is useful if you use multiple PCs connected on a network and you want to access and control all the PCs from a single monitor and keyboard. I like this feature a lot, and have since it was released as "Terminal Services" in NT 4.0. But then again, I have room fulls of PCs in my house and prefer to save myself some walking. If you only own 2 or 3 PCs and they are in the same room, this feature is really of no use to you. Home Edition DOES support the Terminal Services client, which means that your Home Edition machine can remotely log in to another XP machine running Pro Edition.
The ability to log in to a Windows domain may be the most important feature for any networked user, as the lack of this features represents a reduction in functionality from Windows 95 and 98! This feature is clearly aimed toward large business users and again does not really affect home users.
So chances are, if you are a home user, you really can get by with the Home Edition. If you have a ton of PCs networked together, you'll likely need Pro Edition.
LET'S GET STARTED!
Once you install Windows XP, you'll need about 60 minutes to get acquainted with it and to customize it to your liking. This also means download the latest set of patches. As with several recent Windows releases, the version of Windows XP you buy on CD-ROM is already out-of-date by the time you take it out of the box? Why? Because Windows XP was "finished" in August and sent to manufacturing at that time. During the two months between August and October 25th, Microsoft fixed a number of bugs and compatibility issues. As they did with Windows 2000 and Windows Millennium, the day of the Windows XP release meant that about 17 megabytes of patches were also posted to their web site. Yes, it's a pain, and I'll walk you through the procedure.
Ok, so what does Windows XP look like? One of the main paradigm shifts in Windows XP is the attempt to eliminate desktop icons and stuff them all into the Start menu. Yes, the very same desktop icons that first appears in Windows 95 are now considered a "bad thing". So you may be surprised when you first install Windows XP and find the desktop to look like this:
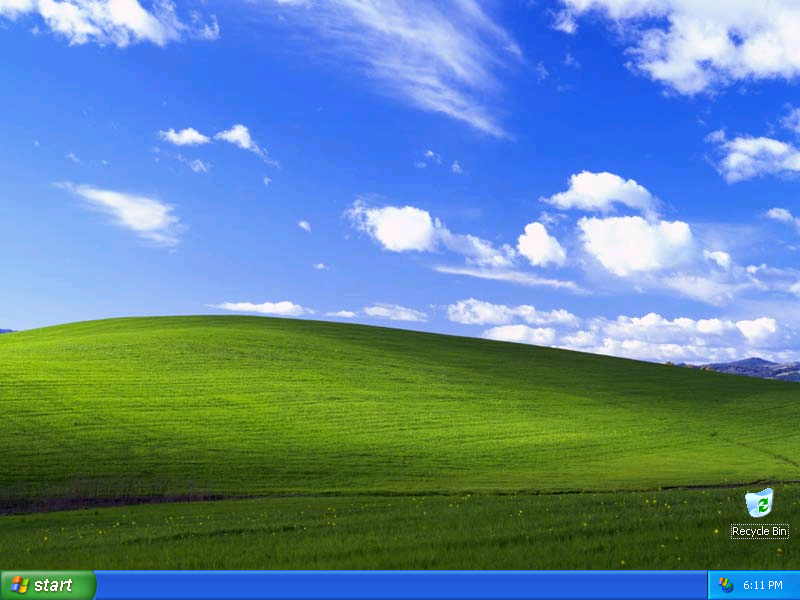
The Recycle Bin icon is the only icon on the desktop. We can change that. First, in order to reduce the time it takes to download these pictures, I'll get rid of the green grass and blue sky picture. To do this, take your mouse and click click the right button. Then select the Properties menu option. This will bring up the Display Properties dialog box.
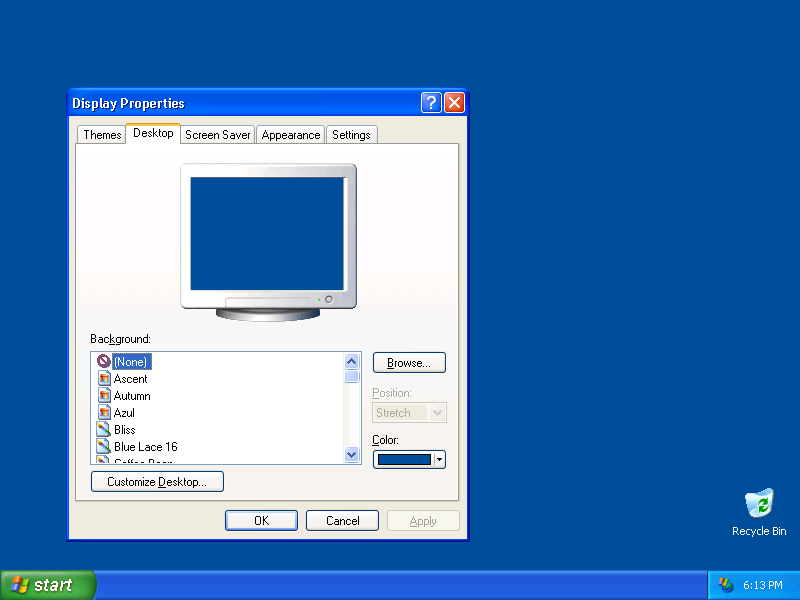
Select the Desktop tab and change the Background setting either to None or to a picture of your choice.
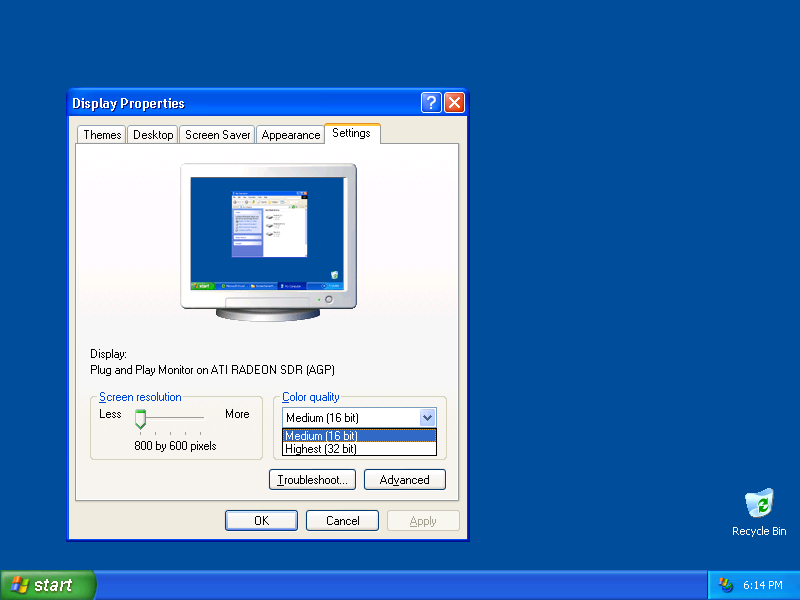
Now click on the Settings tab. You will immediately notice one major difference between Windows XP and earlier releases of Windows. The standard 640x480 16-color VGA mode is no longer the default screen resolution. Instead, 800x600 in 32-bit true color is the default resolution. This is due to the fact that Microsoft is trying to steer people away from 16-color and 256-color palletized video modes, and I suspect this is partly because the Internet Explorer web browser was never really good at rendering images in 256 colors. Opera does a much better job, but I'm only speculating on the true reason here.
In any case, I really prefer not to run in 32-bit video as this tends to slow down screen redraws on older PCs. At least drop the screen depth to 16 bits as shown below. If you actually need 256 color mode or a 640x480 resolution, click on the Advanced button and you will be able to do so.
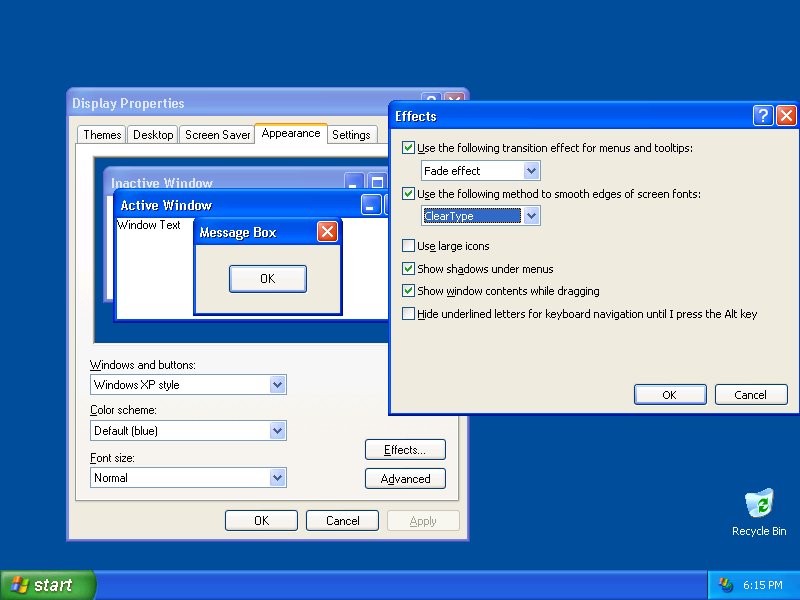
The next step, if like me you've long ago thrown away your fuzzy 21-inch monitor and replaced it with a nice sharp LCD display, is to activate a very cool new feature in Windows XP called ClearType. It's on the list of my 15 reasons to upgrade to XP, because it just plain makes LCD displays display text better. It makes the tiniest font readable, especially on my tiny Sony VAIO pocket computer. To activate ClearType, click on the Appearance tab and then click Effects, and select the ClearType option as shown. You may or may not like the way ClearType draws text, so experiment with the feature turned both on and off.
Now let's take a look at the actual Start menu. Click on the big green Start button in the bottom left corner of the screen. What you will see is a mixture of the old Windows 98 style Start menu merged with all your common desktop icons. My Computer is now just another menu. So is My Documents. The Run and Search menu are still there. The old Shut Down menu is now called Turn Off Computer.
What used to be the old Programs menu is now listed as All Programs. Same menu, which leads you to all your Accessories and installed programs.
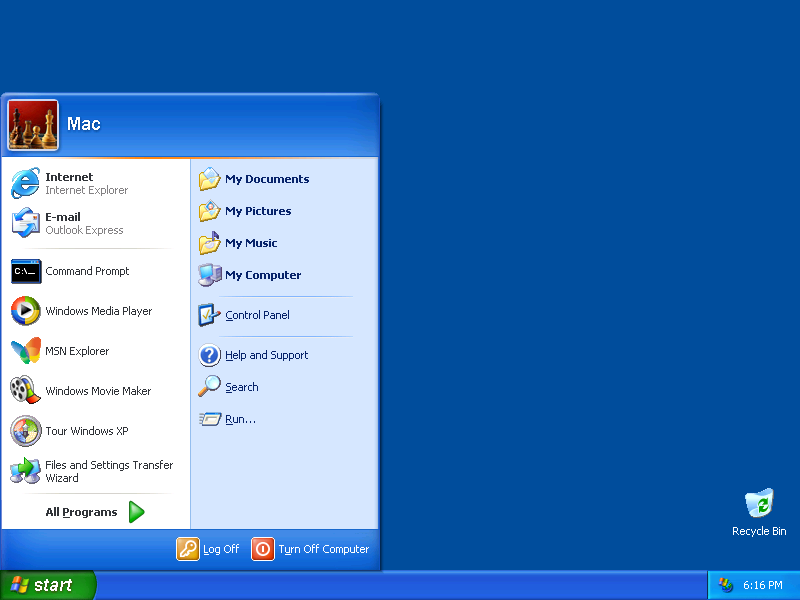
There are two other additions to the Start menu. First, you will see your login name (in this case, "Mac"), and an icon beside it. Each user can select a custom icon or picture to be associated with his login. This is to more easily distinguish the logged in user, and also to distinguish between users at login time. Users of MSN Explorer will be familiar with this already.
The second addition are the icons in the left half of the menu. These are the list of most recently accessed programs, and the list of favorite programs. This is Microsoft's way of getting you eliminate the clutter of icons on your desktop. After all, what do you have on your desktop? An icon for Internet Explorer, an icon for Outlook or Outlook Express, and usually another shortcut icon for each application that you've installed.
So what Windows XP now does is it allows you to put shortcuts to your favorite applications on the top of the Start menu, as Internet Explorer and Outlook Express are shown, and it automatically keeps track of the last few programs that you launched and displays those in the bottom left area of the Start menu.
By default, Windows XP makes Internet Explorer and Outlook Express your favorite web and email applications. You can change this by right clicking each item.
The idea here is to eliminate the clutter of icons on the desktop and simply keep track of what you frequently use. By default, Microsoft starts off this list with 6 items - the Command Prompt, Media Player, MSN Explorer, Movie Maker, Tour, and Transfer Wizard. You can right click each item and select to remove it from the list, or click Pin To Start menu to promote the item up to the favorites list.
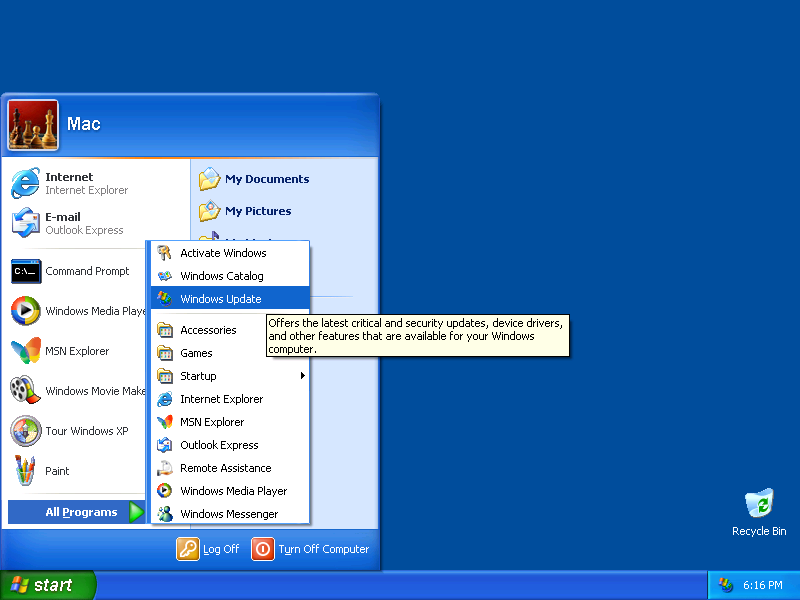
Before we go tinkering with more settings, let's grab the latest Windows XP patches. Click on All Programs, then click on Windows Update. This is a ritual you need to perform about once a week any version of Windows to make sure you're up to date on any security fixes and bug fixes in Windows.
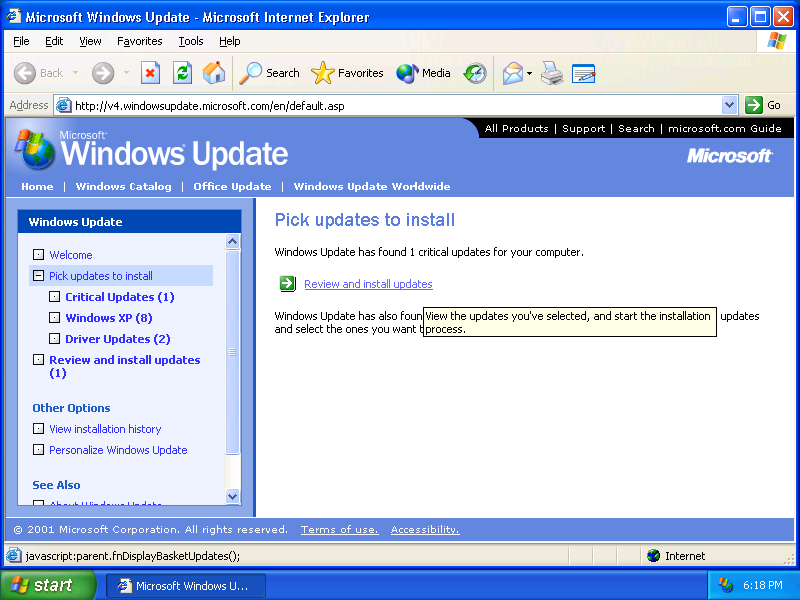
After a few seconds to about a minute, the Windows Update page will display the fact that a number of new updates need to be installed. Note, the Windows Update page is different in Windows XP than in past versions of Windows. Instead of immediately getting a list of patches and updates, you need to manually click on each of the 3 categories shown: Critical Updates, Windows XP, and Driver Updates, and select each item. In the case of this initial update, select all the items. Once you have done this, click Review and install updates and then click Install Now as shown below.
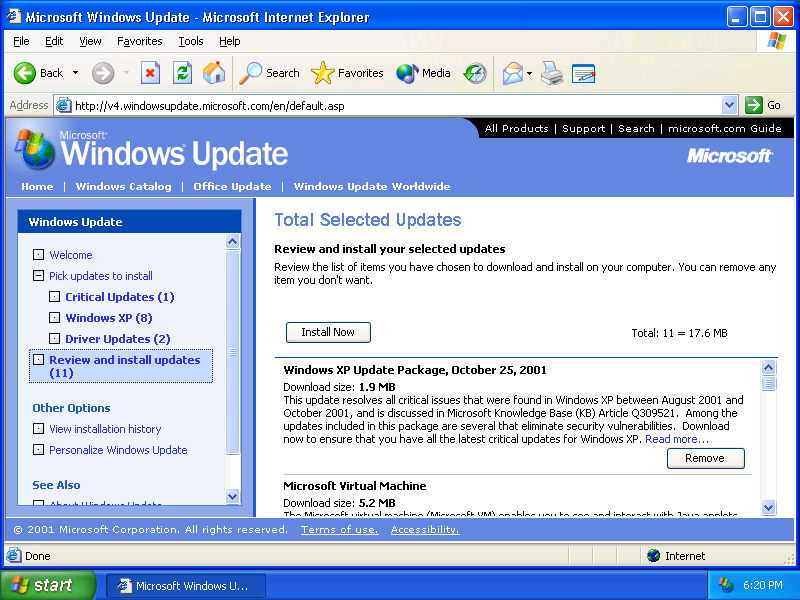
After several minutes to an hour (depending on your Internet connection speed) you will be prompted to restart the computer. Click Yes and allow your computer reboot.
Once your machine is back up, it is time to tweak a few more settings. Bring up the System Properties dialog. If you read my tips on the Secrets page, you know that you can do this by simply pressing the Win+Pause keys or by right clicking the My Computer menu.
You will be presented with basic specification about your computer, such as the release version of Windows XP, the type of processor, the processor speed, and the amount of RAM in the computer. In this case, I was configuring Windows XP on my Athlon XP system as shown here.

There are two features I like to immediately disable in both Windows XP and in earlier releases of Windows. Whether you disable these or leave them on is a matter of preference.
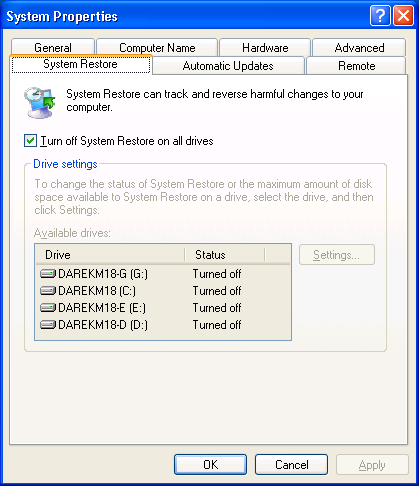
The first is System Restore. Yes, the brain dead feature first introduced last year in Windows Millennium is ba-a-a-ack, although in a much brain dead way. Rather than being feature that is next to impossible to disable as in Windows Millennium, the Windows XP implementation of System Restore is easy to find AND can be disabled on a drive letter by drive letter basis. This makes it possible to, for example, keep your C: drive with your Windows system files protected, but keep your other partitions with data files protected on an as needed basis. I still prefer to shut the feature off completely, so do so by clicking Turn off System Restore on all drives.
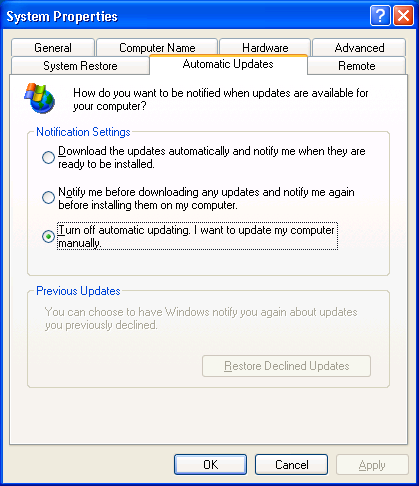
The next feature that irks me is the Automatic Updates. I don't like the thought of Windows automatically download patches or for that matter snooping around the net while I'm not looking. I prefer to run Windows Update manually once a week and do so while I'm watching. So I click on Turn off automatic updating. Again, this is a matter of your own personal preference.
Next I like to fix a very annoying appearance issue. Notice in the previous screen shots how the ? and X buttons at the top of each window are VERY LARGE. I find this to almost be insulting, as their default size is much larger than in other versions of Windows. So off to the Control Panel we go, which you can reach from the Start menu.
Notice the new look of the Conrtol Panel. All the various control applets are grouped by one of 9 categories, as shown.
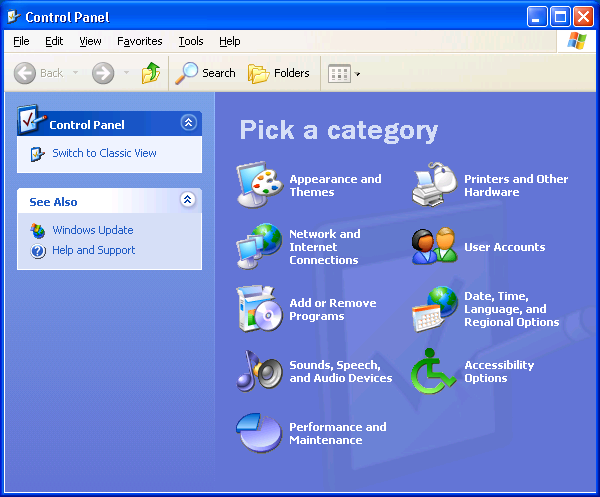
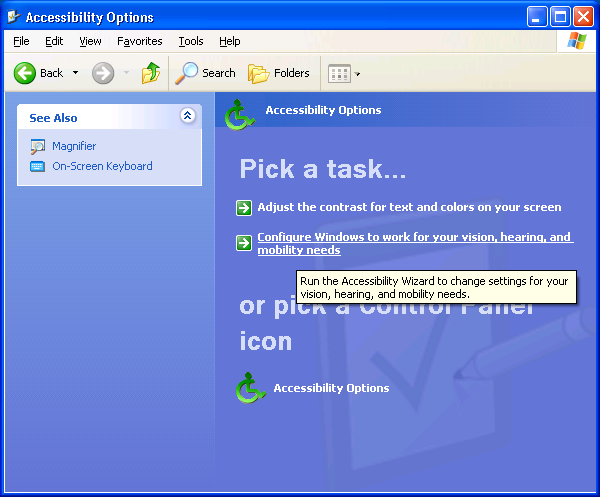
If you wish to see the old view of just having dozens of icons in no particular order, click on Switch to Classic View. The setting we're looking for is under the Accessibility Options icon, so click on that, then click on the Configure Windows to work for your vision, hearing, and mobility needs. Click your way through the wizard (and be sure to click on Disable Personalized Menus, another annoying feature in Windows XP).
While on the subject on old and new looks, press Win+E on your keyboard, or click on My Computer, to bring up the Windows Explorer. Notice the new look of the Explorer. Disk drives and icons are now grouped by function, i.e. by hard disks, by floppies and removable drives such as CD-ROMs, and by networked drive letters. The familiar tree view on the left side is still there.
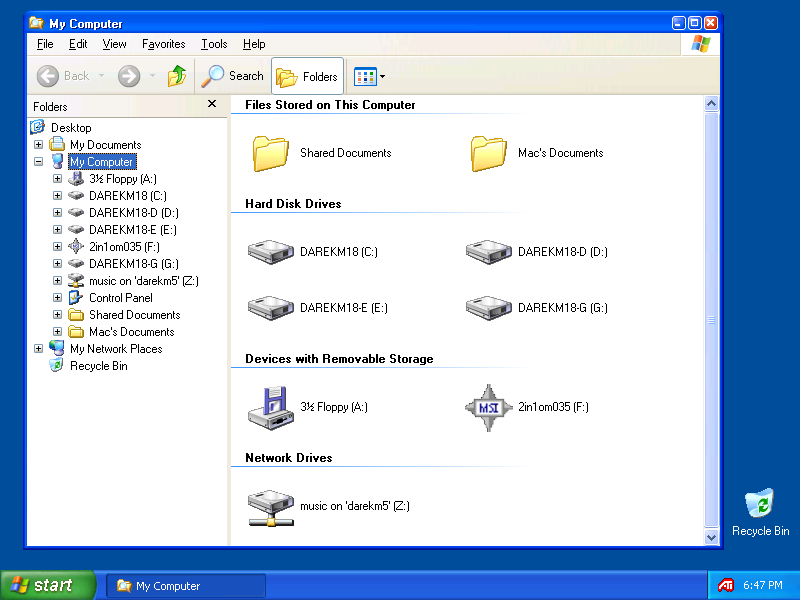
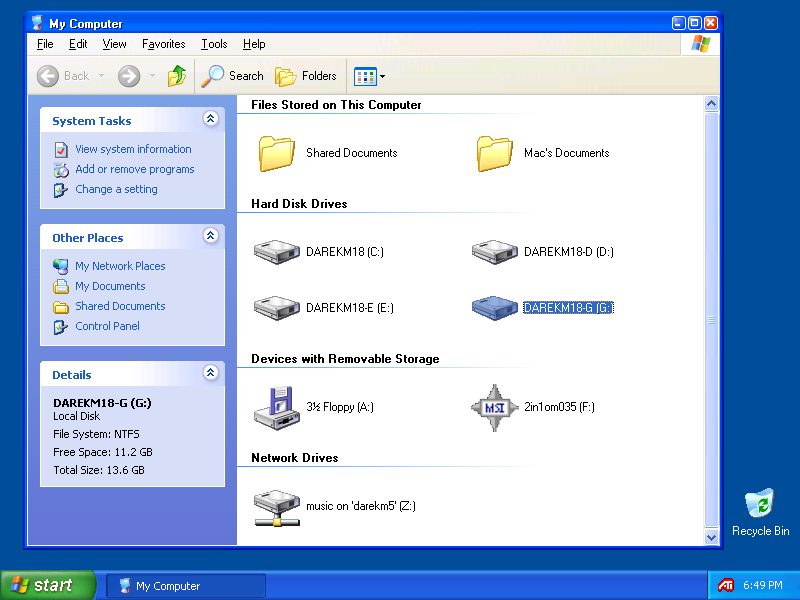
You can replace the old drive tree with a new pane which displays drive information and lists common tasks to perform. Do this by click on the Folders button (to unselect that option), and then click on a drive icon, such as C:. You will see the new pane which displays drive information. As you click on other icons (files for example) the System Tasks list will change, listing tasks such as Rename this file and Copy this file.
I find it awkward, or maybe it's just force of habit, to hunt for My Computer in the Start menu. So I like to put my standard desktop icons back where they belong. Bring up the Display Properties dialog again (by right clicking the desktop and selecting Properties) and go back to the Desktop tab. Click on Customize Desktop and then select which icons you wish to appear back on the desktop.
I also suggest turning off the Run Desktop Cleanup Wizard option. Otherwise you will be prompted on almost a daily basis to remove any icons from your desktop.

Next, we will customize the task bar. You have probably noticed that the familiar row of icons next to the Start menu is missing, compared to say, Windows 98. This is another option that we can modify and which in Windows XP is turn off by default.
Right click on the task bar (the blue strip along the bottom of the screen) and click Properties. You will see the Taskbar and Start Menu Properties dialog. Enable the Quick Launch option if you wish to see the familiar small icons for the Internet Explorer, Media Player, and the minimum desktop icon.
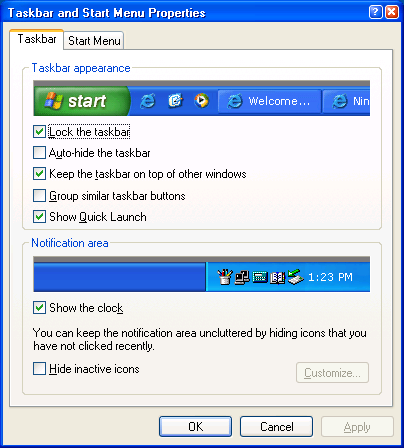
Now click on the Start Menu tab. This is where you can choose to get rid of the new style Start menu and go back to the older simpler one. Do this by clicking on Classic Start menu. Being brave, we'll stick with the new look. In that case, click the Customize button next to the Start menu option and you'll see the Customize Start Menu dialog as shown.

I personally prefer to select Small icons for my Start menu, and I like to increase the Number of programs on Start menu setting to something more than the default value of 6. If you're like me, you run at least a dozen programs on a regular basis.
We're almost done now. The next thing you want to do is clean up the hard disk. First, run the Disk Cleanup utility (it's in the Accessories \ System Tools menu) and tell it to remove any temporary files and System Restore files.
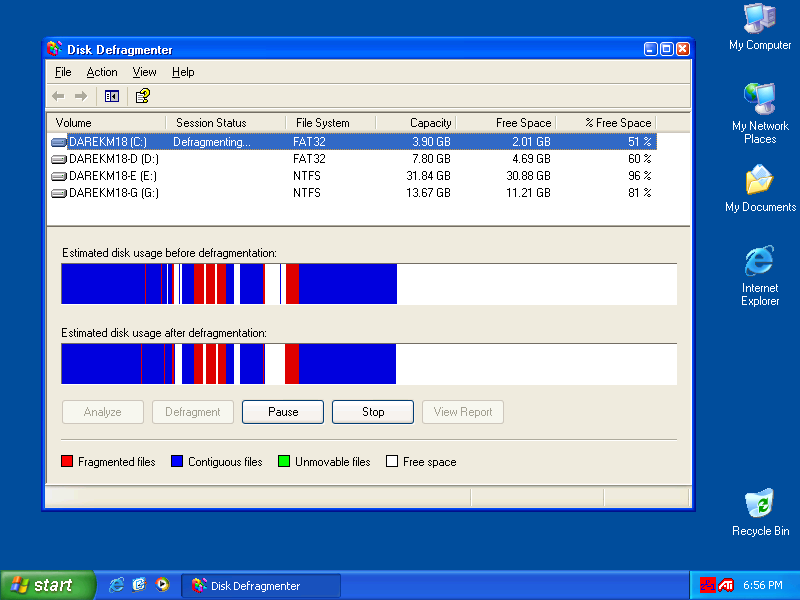
Next, defragment the hard disk by running the Disk Defragmenter utility (also in Accessories \ System Tools). If you are familiar with Windows 2000's disk defragmenter, you will have no problem with the one in Windows XP. It's just about identical, and very similar to the Diskeeper product on which it is based.
Defragment each of your hard disk partitions as shown for the most optimal disk performance. Unlike in Windows 95, 98, and Me, you do not need to exist all other applications before running the defragmenter.
Oh, I almost forgot. Today was end of Daylight Savings Time. Double click on the clock in the bottom right corner of the screen and verify that your PC is actually set to the correct time and the correct time zone.
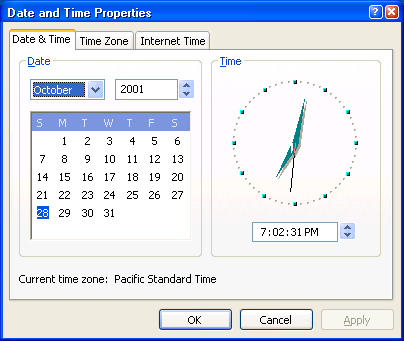
The new Internet Time tab allows you to enable your PC to synchronize its time by itself over the Internet. Again, if you don't mind your computer snooping around the Internet by itself, enable that setting.
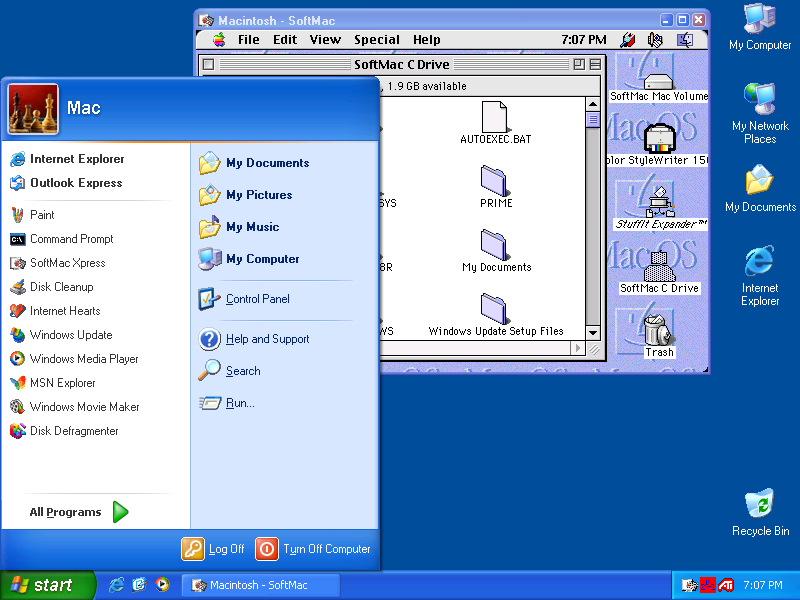
Finally, if you're a Mac user, you may wish to drag your desktop icons over to the right side of the screen as shown. Shameless plug: Then throw in your latest SoftMac XP CD-ROM and install it to you PC. Enjoy the best of both worlds - Windows and Mac - on one desktop. Pictured is our latest SoftMac Xpress 8.11 release from that CD-ROM which features the ability to mount your PC's drives directly on the Mac OS desktop, as shown.
Notice also that by running SoftMac Xpress, Windows has automatically placed a shortcut to the program on the Start menu. As your Start menu fills up, you can either increase the size of the Start menu program list, or delete icons as necessary. Remember, the icons are merely shortcuts. The actual program icons are still located under the All Programs menu tree as in previous versions of Windows.
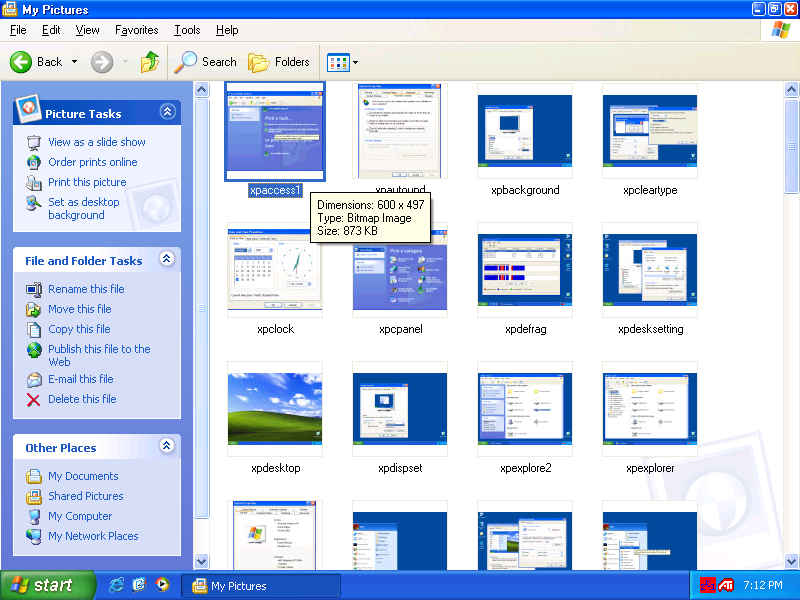
One last nifty feature to show before I finish. When dealing with a large number of picture files, you can now select either Thumbnails or Filmstrip views in the Explorer. The Thumbnails view is shown below. Very handy for organizing screen shots!
And there you have it. The 60 minute guide to customizing and optimizing Windows XP. As you can see from the screen shots, it is not as scary as you may think at first. And in under 60 minutes we updated Windows XP with the latest patches and updates, modified the look of the Start menu and desktop to our liking, cleaned up the hard disk, and got up and running with some software.
Remember to run Windows Update at least once a week, and especially do so if you are still running Windows 98. There are many crucial fixes (such as DirectX 8.0a, security fixes, etc.) which need to be applied to the original Windows 98 release.